작은 tRPC 클라이언트 작성하기

이 페이지는 PageTurner AI로 번역되었습니다(베타). 프로젝트 공식 승인을 받지 않았습니다. 오류를 발견하셨나요? 문제 신고 →
tRPC가 어떻게 동작하는지 궁금한 적 있으신가요? 프로젝트에 기여하고 싶지만 내부 구조가 두려우셨나요? 이 글은 tRPC의 핵심 작동 방식을 다루는 최소한의 클라이언트를 작성하며 내부 구조를 익히는 데 목적을 두고 있습니다.
TypeScript의 핵심 개념인 제네릭, 조건부 타입, extends 키워드, 재귀를 이해하는 것이 권장됩니다. 해당 개념이 익숙하지 않다면, 계속 읽기 전에 Matt Pocock의 초급 TypeScript 튜토리얼을 통해 개념을 익히시길 바랍니다.
개요
다음과 같은 세 가지 프로시저를 가진 간단한 tRPC 라우터가 있다고 가정해 보겠습니다:
tsPost = {id : string;title : string };constposts :Post [] = [];constappRouter =router ({post :router ({byId :publicProcedure .input (z .object ({id :z .string () })).query (({input }) => {constpost =posts .find ((p ) =>p .id ===input .id );if (!post ) throw newTRPCError ({code : "NOT_FOUND" });returnpost ;}),byTitle :publicProcedure .input (z .object ({title :z .string () })).query (({input }) => {constpost =posts .find ((p ) =>p .title ===input .title );if (!post ) throw newTRPCError ({code : "NOT_FOUND" });returnpost ;}),create :publicProcedure .input (z .object ({title :z .string () })).mutation (({input }) => {constpost = {id :uuid (), ...input };posts .push (post );returnpost ;}),}),});
tsPost = {id : string;title : string };constposts :Post [] = [];constappRouter =router ({post :router ({byId :publicProcedure .input (z .object ({id :z .string () })).query (({input }) => {constpost =posts .find ((p ) =>p .id ===input .id );if (!post ) throw newTRPCError ({code : "NOT_FOUND" });returnpost ;}),byTitle :publicProcedure .input (z .object ({title :z .string () })).query (({input }) => {constpost =posts .find ((p ) =>p .title ===input .title );if (!post ) throw newTRPCError ({code : "NOT_FOUND" });returnpost ;}),create :publicProcedure .input (z .object ({title :z .string () })).mutation (({input }) => {constpost = {id :uuid (), ...input };posts .push (post );returnpost ;}),}),});
우리 클라이언트의 목표는 다음과 같은 방식으로 프로시저를 호출할 수 있도록 클라이언트 측에서 이 객체 구조를 재현하는 것입니다:
ts
ts
이를 위해 tRPC는 Proxy 객체와 TypeScript 마법을 조합하여 객체 구조에 .query 및 .mutate 메서드를 추가합니다. 즉, 탁월한 개발자 경험을 제공하기 위해 실제로 수행하는 작업에 대해 '거짓말'을 하는 셈입니다(자세한 내용은 후술).
상위 수준에서 우리가 원하는 것은 post.byId.query()를 서버로의 GET 요청으로, post.create.mutate()를 POST 요청으로 매핑하는 것이며, 모든 타입이 백엔드에서 프론트엔드로 전파되어야 합니다. 그렇다면 어떻게 구현할 수 있을까요?
작은 tRPC 클라이언트 구현하기
🧙♀️ TypeScript 마법
tRPC 사용 시 누리는 멋진 자동 완성과 타입 안전성을 해제하는 재미있는 TypeScript 마법부터 시작해 보겠습니다.
임의 깊이의 라우터 구조를 추론하기 위해 재귀 타입이 필요합니다. 또한 post.byId 및 post.create 같은 프로시저에 각각 .query와 .mutate 메서드를 추가하고 싶습니다. tRPC에서는 이를 프로시저 장식(decorating)이라고 부릅니다. @trpc/server에는 해결된 메서드로 프로시저의 입출력 타입을 추론하는 도우미가 있어, 이 함수들의 타입을 추론하는 데 활용할 것입니다. 이제 코드를 작성해 봅시다!
경로에 대한 자동 완성과 프로시저 입출력 타입 추론을 제공하기 위해 달성하고자 하는 목표를 고려해 보겠습니다:
-
라우터에 있을 때는 해당 하위 라우터와 프로시저에 접근할 수 있어야 합니다(곧 다룰 예정).
-
쿼리 프로시저에 있을 때는
.query를 호출할 수 있어야 합니다. -
변형(mutation) 프로시저에 있을 때는
.mutate를 호출할 수 있어야 합니다. -
그 외 항목에 접근하려고 할 때는 백엔드에 존재하지 않는 프로시저임을 알리는 타입 오류가 발생해야 합니다.
이를 수행할 타입을 생성해 봅시다:
tsDecorateProcedure <TProcedure > =TProcedure extendsAnyTRPCQueryProcedure ? {query :Resolver <TProcedure >;}:TProcedure extendsAnyTRPCMutationProcedure ? {mutate :Resolver <TProcedure >;}: never;
tsDecorateProcedure <TProcedure > =TProcedure extendsAnyTRPCQueryProcedure ? {query :Resolver <TProcedure >;}:TProcedure extendsAnyTRPCMutationProcedure ? {mutate :Resolver <TProcedure >;}: never;
tRPC의 내장 추론 도우미를 활용해 프로시저의 입출력 타입을 추론하여 Resolver 타입을 정의하겠습니다.
tsAnyTRPCProcedure ,inferProcedureInput ,inferProcedureOutput ,AnyTRPCQueryProcedure ,AnyTRPCMutationProcedure } from '@trpc/server';typeResolver <TProcedure extendsAnyTRPCProcedure > = (input :inferProcedureInput <TProcedure >,) =>Promise <inferProcedureOutput <TProcedure >>;
tsAnyTRPCProcedure ,inferProcedureInput ,inferProcedureOutput ,AnyTRPCQueryProcedure ,AnyTRPCMutationProcedure } from '@trpc/server';typeResolver <TProcedure extendsAnyTRPCProcedure > = (input :inferProcedureInput <TProcedure >,) =>Promise <inferProcedureOutput <TProcedure >>;
post.byId 프로시저에서 이 타입을 테스트해 보겠습니다:
tsPostById =Resolver <AppRouter ['post']['byId']>;
tsPostById =Resolver <AppRouter ['post']['byId']>;
좋습니다! 예상대로 프로시저에서 .query를 호출하고 정확한 입출력 타입이 추론됩니다!
마지막으로 라우터를 재귀적으로 순회하며 경로의 모든 프로시저를 장식하는 타입을 생성하겠습니다:
tsTRPCRouterRecord } from "@trpc/server";import type {AnyTRPCRouter } from "@trpc/server";typeDecorateRouterRecord <TRecord extendsTRPCRouterRecord > = {[TKey in keyofTRecord ]:TRecord [TKey ] extends infer$Value ?$Value extendsTRPCRouterRecord ?DecorateRouterRecord <$Value >:$Value extendsAnyTRPCProcedure ?DecorateProcedure <$Value >: never: never;};
tsTRPCRouterRecord } from "@trpc/server";import type {AnyTRPCRouter } from "@trpc/server";typeDecorateRouterRecord <TRecord extendsTRPCRouterRecord > = {[TKey in keyofTRecord ]:TRecord [TKey ] extends infer$Value ?$Value extendsTRPCRouterRecord ?DecorateRouterRecord <$Value >:$Value extendsAnyTRPCProcedure ?DecorateProcedure <$Value >: never: never;};
이 타입을 조금 분석해 보겠습니다:
-
제네릭으로
TRPCRouterRecord를 타입에 전달합니다. 이는 tRPC 라우터에 존재하는 모든 프로시저와 하위 라우터를 포함하는 타입입니다. -
레코드의 키(프로시저 또는 라우터 이름)를 순회하며 다음을 수행합니다:
- 키가 라우터를 가리키는 경우, 해당 라우터의 프로시저 레코드에 대해 재귀적으로 타입을 적용하여 모든 프로시저를 데코레이팅합니다. 이를 통해 경로 탐색 시 자동완성이 제공됩니다.
- 키가 프로시저를 가리키는 경우, 앞서 생성한
DecorateProcedure타입을 사용해 프로시저를 데코레이팅합니다. - 키가 프로시저나 라우터가 아닌 경우
never타입을 할당하여 "이 키는 존재하지 않음"을 의미하게 합니다. 이는 접근 시도 시 타입 오류를 발생시킵니다.
🤯 프록시 재매핑 구현하기
이제 타입 설정을 완료했으므로, 실제로 클라이언트에서 서버의 라우터 정의를 확장해 프로시저를 일반 함수처럼 호출할 수 있도록 하는 기능을 구현해야 합니다.
먼저 재귀적 프록시 생성을 위한 헬퍼 함수 createRecursiveProxy를 생성합니다:
이 구현은 일부 에지 케이스를 처리하지 않는다는 점을 제외하면 실제 프로덕션 코드와 거의 동일합니다. 직접 확인해 보세요!
tsProxyCallbackOptions {path : readonly string[];args : readonly unknown[];}typeProxyCallback = (opts :ProxyCallbackOptions ) => unknown;functioncreateRecursiveProxy (callback :ProxyCallback ,path : readonly string[]) {constproxy : unknown = newProxy (() => {// dummy no-op function since we don't have any// client-side target we want to remap to},{get (_obj ,key ) {if (typeofkey !== 'string') returnundefined ;// Recursively compose the full path until a function is invokedreturncreateRecursiveProxy (callback , [...path ,key ]);},apply (_1 ,_2 ,args ) {// Call the callback function with the entire path we// recursively created and forward the argumentsreturncallback ({path ,args ,});},},);returnproxy ;}
tsProxyCallbackOptions {path : readonly string[];args : readonly unknown[];}typeProxyCallback = (opts :ProxyCallbackOptions ) => unknown;functioncreateRecursiveProxy (callback :ProxyCallback ,path : readonly string[]) {constproxy : unknown = newProxy (() => {// dummy no-op function since we don't have any// client-side target we want to remap to},{get (_obj ,key ) {if (typeofkey !== 'string') returnundefined ;// Recursively compose the full path until a function is invokedreturncreateRecursiveProxy (callback , [...path ,key ]);},apply (_1 ,_2 ,args ) {// Call the callback function with the entire path we// recursively created and forward the argumentsreturncallback ({path ,args ,});},},);returnproxy ;}
이 코드가 어떻게 동작하는지 꽤 신비롭게 보일 수 있습니다. 어떤 원리일까요?
-
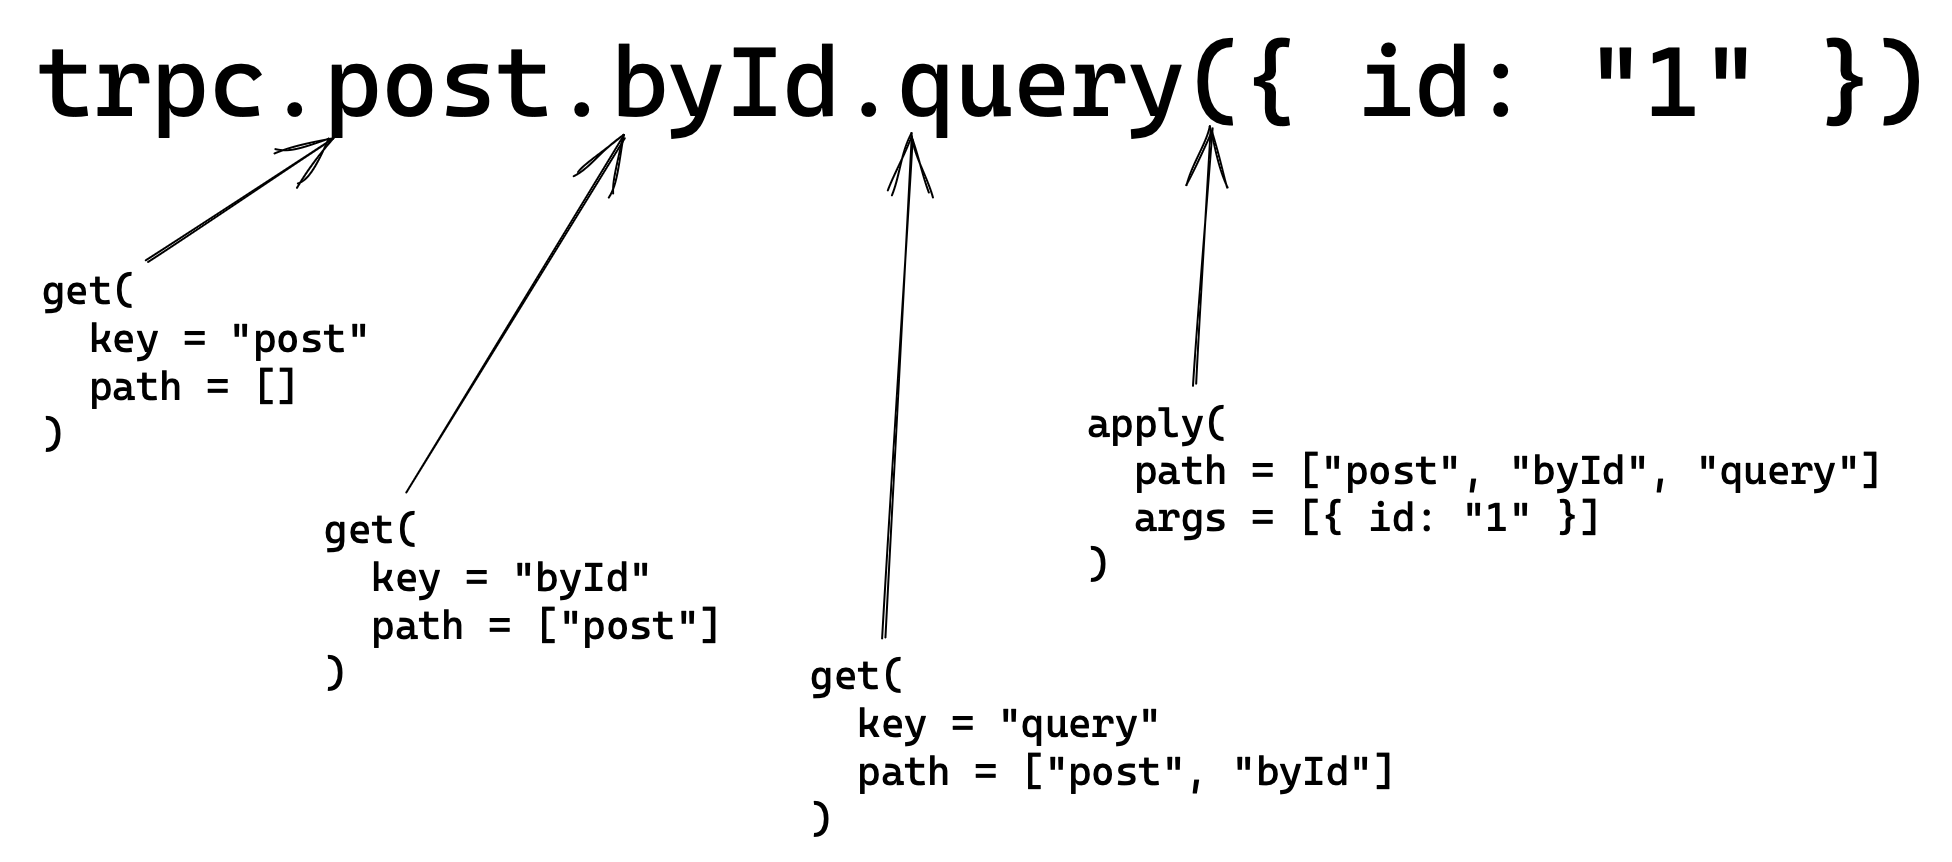
get메서드는post.byId와 같은 프로퍼티 접근을 처리합니다. 키는 접근하는 프로퍼티 이름으로,post를 입력하면key는post가 되고,post.byId를 입력하면key는byId가 됩니다. 재귀적 프록시는 이러한 키들을 최종 경로(예: ["post", "byId", "query"])로 결합하여 요청을 보낼 URL을 결정합니다. -
apply메서드는 프록시에서.query(args)와 같은 함수를 호출할 때 실행됩니다.args는 함수에 전달한 인자로,post.byId.query(args)를 호출하면args는 입력값이 됩니다. 이 입력값은 프로시저 유형에 따라 쿼리 파라미터 또는 요청 본문으로 제공됩니다.createRecursiveProxy는 콜백 함수를 입력받으며, 이 콜백 함수에 경로와 인자를 사용하여apply메서드를 매핑합니다.
아래는 trpc.post.byId.query({ id: 1 }) 호출 시 프록시가 동작하는 방식을 시각적으로 표현한 것입니다:
🧩 모든 요소 통합하기
이제 헬퍼 함수의 동작을 이해했으니, 이를 사용해 클라이언트를 생성해 보겠습니다. createRecursiveProxy에 경로와 인자를 받아 fetch를 사용해 서버에 요청하는 콜백을 제공합니다. 함수에 tRPC 라우터 타입(AnyTRPCRouter)을 허용하는 제네릭을 추가하고, 반환 타입을 앞서 생성한 DecorateRouterRecord 타입으로 캐스팅합니다:
tsTRPCResponse } from '@trpc/server/rpc';export constcreateTinyRPCClient = <TRouter extendsAnyTRPCRouter >(baseUrl : string,) =>createRecursiveProxy (async (opts ) => {constpath = [...opts .path ]; // e.g. ["post", "byId", "query"]constmethod =path .pop ()! as 'query' | 'mutate';constdotPath =path .join ('.'); // "post.byId" - this is the path procedures have on the backendleturi = `${baseUrl }/${dotPath }`;const [input ] =opts .args ;conststringifiedInput =input !==undefined &&JSON .stringify (input );letbody : undefined | string =undefined ;if (stringifiedInput !== false) {if (method === 'query') {uri += `?input=${encodeURIComponent (stringifiedInput )}`;} else {body =stringifiedInput ;}}constjson :TRPCResponse = awaitfetch (uri , {method :method === 'query' ? 'GET' : 'POST',headers : {'Content-Type': 'application/json',},body ,}).then ((res ) =>res .json ());if ('error' injson ) {throw newError (`Error: ${json .error .message }`);}// No error - all good. Return the data.returnjson .result .data ;}, []) asDecorateRouterRecord <TRouter ['_def']['record']>;// ^? provide empty array as path to begin with
tsTRPCResponse } from '@trpc/server/rpc';export constcreateTinyRPCClient = <TRouter extendsAnyTRPCRouter >(baseUrl : string,) =>createRecursiveProxy (async (opts ) => {constpath = [...opts .path ]; // e.g. ["post", "byId", "query"]constmethod =path .pop ()! as 'query' | 'mutate';constdotPath =path .join ('.'); // "post.byId" - this is the path procedures have on the backendleturi = `${baseUrl }/${dotPath }`;const [input ] =opts .args ;conststringifiedInput =input !==undefined &&JSON .stringify (input );letbody : undefined | string =undefined ;if (stringifiedInput !== false) {if (method === 'query') {uri += `?input=${encodeURIComponent (stringifiedInput )}`;} else {body =stringifiedInput ;}}constjson :TRPCResponse = awaitfetch (uri , {method :method === 'query' ? 'GET' : 'POST',headers : {'Content-Type': 'application/json',},body ,}).then ((res ) =>res .json ());if ('error' injson ) {throw newError (`Error: ${json .error .message }`);}// No error - all good. Return the data.returnjson .result .data ;}, []) asDecorateRouterRecord <TRouter ['_def']['record']>;// ^? provide empty array as path to begin with
특히 주목할 점은 경로가 /가 아닌 .으로 구분된다는 것입니다. 이를 통해 서버에서 각 프로시저마다 별도의 핸들러를 두지 않고 단일 API 핸들러가 모든 요청을 처리할 수 있습니다. Next.js처럼 파일 기반 라우팅을 사용하는 프레임워크를 사용 중이라면, 모든 프로시저 경로를 처리하는 캐치올(catchall) 파일 /api/trpc/[trpc].ts를 떠올릴 수 있을 것입니다.
또한 fetch 요청에는 TRPCResponse 타입 어노테이션이 추가됩니다. 이는 서버가 응답하는 JSONRPC 호환 응답 형식을 정의합니다. 자세한 내용은 여기에서 확인할 수 있습니다. 간단히 말해, 응답에는 result 또는 error 객체가 포함되어 요청 성공 여부를 판단하고 오류 발생 시 적절한 처리를 할 수 있습니다.
이게 전부입니다! 이 코드만으로도 클라이언트에서 tRPC 프로시저를 로컬 함수처럼 호출할 수 있습니다. 표면적으로는 단순히 publicProcedure.query / mutation의 리졸버 함수를 일반 프로퍼티 접근으로 호출하는 것처럼 보이지만, 실제로는 네트워크 경계를 넘어 동작하므로 Prisma 같은 서버 사이드 라이브러리를 사용하면서 데이터베이스 자격 증명이 유출되지 않습니다.
직접 해보기!
이제 클라이언트를 생성하고 서버 URL을 제공하면, 프로시저를 호출할 때 완벽한 자동완성과 타입 안전성을 얻을 수 있습니다!
ts
ts
전체 클라이언트 코드는 여기에서 확인할 수 있으며, 사용 예시 테스트는 여기에서 볼 수 있습니다.
결론
이 글이 tRPC의 작동 방식을 이해하는 데 도움이 되었기를 바랍니다. 실제 프로덕션에서는 @trpc/client를 사용하시길 권장합니다. 몇 KB 더 큰 용량이지만 우리가 보여준 것보다 훨씬 많은 유연성을 제공합니다:
-
중단 신호(abort signals), SSR 등을 위한 쿼리 옵션
-
링크(Link) 시스템
-
프로시저 일괄 처리(batching)
-
WebSocket/구독(subscriptions) 지원
-
체계적인 오류 처리
-
데이터 변환기(transformers)
-
tRPC 규격 응답이 아닌 경우를 포함한 에지 케이스 처리
오늘은 서버 측 구현을 다루지 않았는데, 아마도 다음 기사에서 다룰 예정입니다. 궁금한 점이 있다면 트위터로 문의해주세요.